
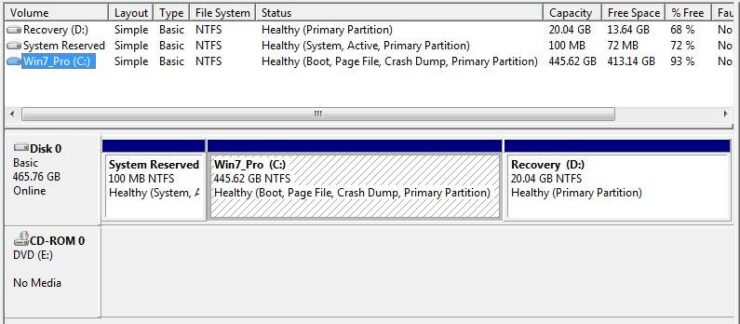
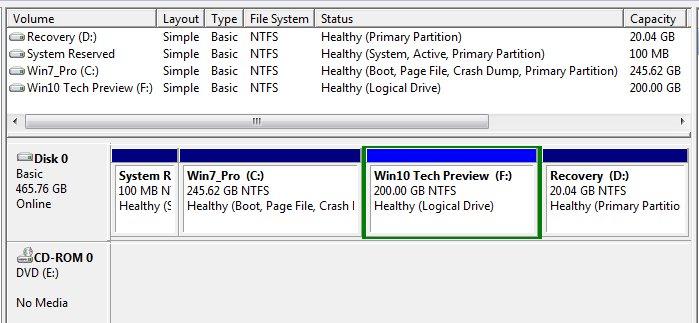
The 500GB hard drive I’m using for this article contains 3 partitions. The first is the 100MB System, Reserved partition, the second is the Windows 7 partition and the third and last partition is a Windows 7 recovery partition.
To create space on the drive for Windows 10 we must first use Windows 7’s Disk Management to “Shrink” the Windows 7 partition which results in “unallocated” space for use when installing Windows 10.
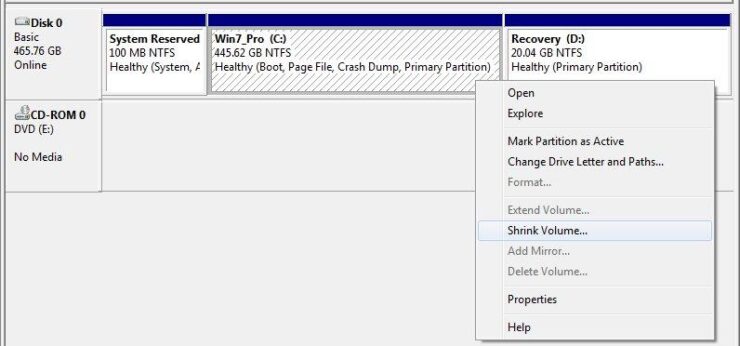
1. Open Disk Management and right click on the Windows 7 partition.
2. Select the “Shrink Volume” option.
3. I’m going to create 200GB of “Unallocated” for Windows 10, although 100GB is more than enough for all practical purposes. So in the “Enter the amount of space to shrink in MB” box, I entered a value of 204800 (200GB = 200 x 1024 or 204800), for a 100GB partition the value would be 102400.

Note that the “Size of available shrink space in MB” is the maximum amount the Windows 7 partition can be reduced by. Sometimes the use of a 3rd party utility such as Partition Wizard Home Edition or EASEUS Partition Master Home Edition may be required as the location of the Master File Table (MFT) or other locked files may limit the amount of space/value in MB that you can enter.
4. Click on the “Shrink” button after you enter the appropriate value for your hard drive. When the

At this point, you can either choose to pre-format the unallocated space (see step #5) in advance of installing Windows 10 or leave the space “Unallocated” and format during the 10 installation process. If you want to leave the space as “Unallocated” then skip to step #6.
5) Formatting the unallocated space:
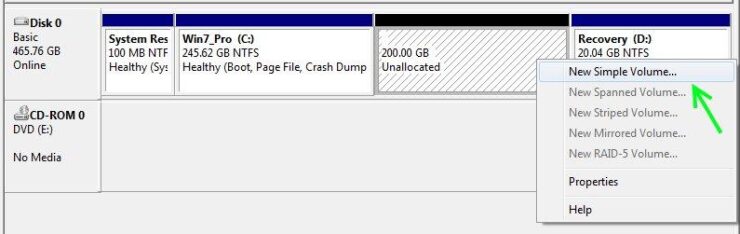
Right-click on the “Unallocated” space and choose the ‘New Simple Volume …’ option.
Note that if your hard drive already has 4 primary partitions you will need to create an ‘Extended’ partition with a single logical drive.
If you want to check the hard drive’s partition for bad sectors remove the check mark from the ‘Perform a quick format’ option, it takes longer to format but it’s the safest formatting method. Solid State Drive users should only perform a quick format.
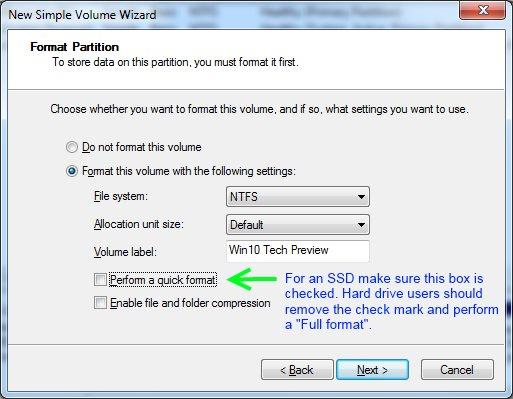
Give the Volume label an easy-to-recognize name as this will make it easier to spot which partition you want to install Windows 10 on during the installation process.
6) At this point it’s time to create your second baseline backup.
This is the backup you can use to reset /restore your drive back to a pre-Windows 10 state should the Windows 10 preview installation fail for whatever reason and you need to try installing Windows 10 again. After creating this backup you would then only need to restore 3 partitions (System, Windows 7 and the pre-formatted partition) to try installing Windows 10 again.
Read Also: